

Digital Zone Blog: Your Guide to the Digital Frontier. Dive into the world of digital technology, uncovering trends, insights, and innovations that shape our digital future.”
How to Use ChatGPT APP . In the ever-evolving world of technology, application programming interfaces (APIs) have become indispensable tools for developers. They allow for seamless integration of various services and functionalities into applications, opening up a world of possibilities. One such API that has gained immense popularity is the ChatGPT API. In this article, we will walk you through the process of using the ChatGPT API effectively.
Understanding the Basics
What is the ChatGPT API?
The ChatGPT API is a powerful tool offered by OpenAI that allows developers to integrate ChatGPT, a sophisticated language model, into their applications, products, or services. This API enables you to harness the capabilities of ChatGPT, such as natural language understanding and generation, to enhance user experiences.
How to Use ChatGPT API
Before diving into the nitty-gritty details, you need to take a few essential steps to set up and start using the ChatGPT API.
Step 1: Obtain API Access
To access the ChatGPT API, you must first sign up for an API key from OpenAI. This key serves as your gateway to unlock the full potential of ChatGPT within your applications.
Step 2: Installation
Once you have your API key, you’ll need to integrate it into your development environment. OpenAI provides comprehensive documentation to help you with the installation process.
Now that you have everything set up, let’s explore how to make requests to the ChatGPT API.
Sending a Prompt
To interact with ChatGPT, you send a series of messages as prompts to the API. Each message consists of a ‘role’ and ‘content.’
Close view of a man with opened AI chat on laptop
Handling Responses
The API responds with a model-generated message that you can extract and display in your application. You can continue the conversation by extending the list of messages in the prompt.
Best Practices
To make the most of the ChatGPT API, consider the following best practices:
1. Clear and Specific Prompts
Ensure that your prompts are concise and clearly state what you want from ChatGPT. This will take you to more accurate and helpful responses.
2. System Messages
Include system messages to set the behavior of the assistant. For example, you can instruct it to speak like Shakespeare for a unique user experience.
3. Message Ordering
The order of messages matters. The assistant responds to the last message in the list, so structure your prompts accordingly.
Advanced Usage
As you become more familiar with the ChatGPT API, you can explore advanced features like temperature and max tokens to fine-tune the responses to your specific needs.
Conclusion
The ChatGPT API offers endless possibilities for enhancing your applications and services with natural language processing capabilities. By following the steps outlined in this guide and adhering to best practices, you can leverage ChatGPT to create more engaging and interactive user experiences.
FAQs
Q1: Is the ChatGPT API free to use?
No, the ChatGPT API is not free. You can refer to OpenAI’s pricing page for detailed information on the costs associated with using the API.
Q2: Can I use ChatGPT in multiple programming languages?
Yes, you can use the ChatGPT API in various programming languages as long as you can make HTTP requests. OpenAI provides client libraries and examples for popular languages like Python.
Q3: Are there any limitations on API usage?
Yes, there are rate limits and usage limits imposed on the ChatGPT API. These limits vary depending on your subscription tier.
Q4: Can I use the ChatGPT API for commercial applications?
Yes, the ChatGPT API is available for both commercial and non-commercial use. OpenAI encourages developers to explore its potential for a wide range of applications.
Q5: Where can I find more resources and documentation?
You can find comprehensive documentation, tutorials, and developer resources on the OpenAI website to help you get started with the ChatGPT API.
In the world of artificial intelligence and natural language processing, ChatGPT has emerged as a revolutionary tool. But what goes on behind the scenes to make ChatGPT’s interactions with users so seamless and intelligent? In this article, we’ll take a deep dive into the architecture of ChatGPT, shedding light on the technology that powers this remarkable AI.
Table of Contents
The Evolution of ChatGPT
Before delving into the architecture, let’s briefly touch upon the evolution of ChatGPT. It all started with the development of GPT-3, the third iteration of the Generative Pre-trained Transformer by OpenAI. GPT-3 was already an impressive language model, but it takes it a step further by fine-tuning it specifically for natural, human-like conversations.
H1: Transformers at the Core
At the heart of it’s architecture lies the Transformer model. Transformers are deep learning models that have gained immense popularity in recent years due to their ability to handle sequential data effectively. It leverages Transformers to process and generate text in a conversational manner.
H2: Pre-training and Fine-tuning
To make ChatGPT’s interactions more contextually aware, it undergoes a two-step process: pre-training and fine-tuning. During pre-training, the model learns from a massive dataset containing text from the internet. This helps it grasp grammar, facts, and some reasoning abilities.
H3: Fine-tuning for Conversations
Fine-tuning, however, is where the magic happens. OpenAI uses reinforcement learning from human feedback (RLHF) to train it. Human AI trainers engage in conversations with the model and provide feedback, helping it learn to respond appropriately to a wide range of user inputs.
H4: Scaling to ChatGPT-4
OpenAI continually refines it’s architecture. As of my last knowledge update in September 2021, ChatGPT had evolved to ChatGPT-3. But it’s safe to assume that OpenAI has made significant progress since then, possibly even introducing ChatGPT-4 or beyond.
The Architecture in Action
Now that we understand the basics of it’s architecture, let’s see it in action. When you send a query or prompt to ChatGPT, it goes through a multi-step process:
Input Encoding: Your text input is tokenized and encoded into a numerical format that the model can understand.
Contextual Understanding: It uses its pre-trained knowledge to understand the context of your query. It remembers the conversation history to maintain context.
Response Generation: Based on its understanding of the context, it generates a response. It takes into account grammar, coherence, and relevance.
Output Decoding: The model’s response is decoded from numerical format back into natural language, and you receive it as text.
How ChatGPT Learns to be Human-like
One of the remarkable aspects of it is its ability to mimic human conversation. Here’s how it achieves this:
Diverse Training Data: During pre-training, it is exposed to a wide variety of internet text, including informal conversations, news articles, and more. This diversity helps it adapt to different communication styles.
Feedback Loop: Fine-tuning with RLHF introduces a feedback loop that continuously refines it’s responses based on user feedback. This iterative process makes it increasingly human-like over time.
Conclusion
Understanding the architecture behind it reveals the intricate technology that powers this AI marvel. With Transformers, pre-training, fine-tuning, and a feedback loop, it transforms text input into meaningful, context-aware responses, making it an invaluable tool in the realm of natural language processing.
Frequently Asked Questions (FAQs)
Is ChatGPT constantly learning and improving?
Yes, it undergoes continuous improvement through fine-tuning based on user feedback.
How does it handle different languages?
It is capable of understanding and generating text in multiple languages, but its proficiency varies by language.
Can it generate code or perform specific tasks?
Yes, it can generate code, answer questions, write content, and perform various text-based tasks.
Is it aware of its own existence?
No, it lacks self-awareness and operates solely based on its training data and algorithms.
Where can I access ChatGPT for personal or business use?
You can access it by visiting https://chat.openai.com/ to explore its capabilities and integrate it into your applications or workflows.
In the rapidly evolving landscape of modern business, data has become an invaluable asset. From enhancing decision-making processes to improving operational efficiency, data plays a pivotal role. However, raw data is often complex and unstructured, necessitating its transformation into a more useful and understandable format. This is the place where data transformation tools come into play. In this guide, we will explore the essential aspects of selecting the right data transformation tool for your business needs.
Table of Contents
Introduction
In the realm of data-driven decision-making, the quality of insights is only as good as the quality of the data being analyzed. Raw data often requires transformation to ensure its accuracy, completeness, and relevance. Data transformation involves processes like cleaning, structuring, and aggregating data, ultimately turning it into a more usable format.
Key Considerations for Choosing a Data Transformation Tool
Selecting the right data transformation tool involves a comprehensive evaluation of several key factors:
Compatibility with Data Sources
An ideal data transformation tool should seamlessly integrate with a variety of data sources, including databases, cloud storage, and third-party applications. Compatibility ensures that the tool can handle data from multiple sources, creating a unified and comprehensive dataset.
Transformation Flexibility and Complexity
Different business scenarios demand varying levels of data transformation complexity. The chosen tool should offer a wide range of transformation functions, from simple data cleaning to complex transformations involving calculations and merging of datasets.
Scalability and Performance
As your work grows, so does the volume of data. The selected tool should be capable of handling large datasets without compromising on performance. Scalability ensures that data transformation processes remain efficient even as data volume increases.
Illustration of social media concept
User-Friendliness and Learning Curve
User adoption is crucial for any technology implementation. Opt for a tool with an intuitive interface and minimal learning curve. This empowers your team to utilize the tool effectively without extensive training.
Types of Data Transformation Tools
There are several types of data transformation tools available, each catering to specific needs:
ETL (Extract, Transform, Load) Tools
ETL tools are designed for batch processing and are suitable for large-scale data integration projects. They extract data from various sources, apply transformations, and load it into a target destination.
Data Wrangling and Preparation Tools
These tools focus on data exploration, cleaning, and transformation at a granular level. They are ideal for scenarios where data needs to be prepared for analysis quickly.
Self-Service Data Preparation Tools
These tools empower business users to perform basic data transformations without extensive IT involvement. They offer a balance between usability and control.
Factors Affecting Tool Selection
The following factors would guide your decision-making process:
Business Requirements and Use Cases
Identify your specific data transformation needs. Consider the types of transformations required and how frequently they will be performed.
Budgetary Constraints
Set a clear budget for the tool acquisition and implementation. Factor in costs associated with training, maintenance, and potential upgrades.
Integration with Existing Systems
Ensure that the chosen tool can integrate seamlessly with your existing technology stack, including analytics and reporting tools.
Data Security and Compliance
Data security and compliance are paramount. Choose a tool that adheres to relevant data protection regulations and offers robust security features.
Making an Informed Decision
To make the right choice:
Conduct Proof of Concept (PoC) Trials: Test the shortlisted tools with real-world data to assess their performance in your specific use cases.
Gather User Feedback: Involve potential users in the evaluation process to understand usability and address any concerns.
Consider Future Growth: Choose a tool that can evolve with your business and accommodate future data transformation requirements.
Conclusion
Choosing the right data transformation tool is pivotal for harnessing the true potential of your data. By considering compatibility, flexibility, scalability, and user-friendliness, you can empower your business with accurate insights and streamlined operations.
In today’s interconnected digital landscape, where data travels at the speed of light, ensuring the security of your routes has become a paramount concern. Route security forms the foundation of a robust network infrastructure, guarding against cyber threats and unauthorized access. In this article, we’ll delve into the intricacies of security, uncovering vulnerabilities that can compromise the integrity of your data transmission.
Table of Contents
Introduction
As the backbone of modern communication, route security plays a critical role in maintaining the confidentiality, integrity, and availability of transmitted data. It involves the deployment of measures to prevent unauthorized access, interception, and manipulation of information as it traverses various network nodes.
Understanding Route Security
What is Route Security?
It refers to the strategies, protocols, and technologies employed to safeguard the paths that data packets take from source to destination in a network. It ensures that data follows designated routes and isn’t diverted or compromised during transit.
Why is Route Security Crucial?
It is vital because it prevents attackers from intercepting sensitive information or redirecting it to malicious destinations. Compromised routes can lead to data breaches, unauthorized access, and service disruptions, making it a top priority for organizations of all sizes.
Common Vulnerabilities in Route Security
Lack of Encryption
Unencrypted data packets are susceptible to eavesdropping, where attackers can intercept and decipher the information being transmitted. Encryption ensures that even if intercepted, the data remains unreadable without the decryption key.
Unauthorized Access Points
Weak access controls can lead to unauthorized users gaining entry to the network. Once inside, they could manipulate routing tables, redirect traffic, or launch attacks from within.
Routing Protocol Vulnerabilities
Routing protocols are susceptible to manipulation by attackers who can inject malicious routes into the network. This can result in data being routed through compromised paths.
Distributed Denial of Service (DDoS) Attacks
DDoS attacks overwhelm network resources, causing service disruptions. Attackers can target routers, rendering them unable to process legitimate traffic.
Impacts of Compromised Route Security
Data Interception
If routes are compromised, attackers can intercept sensitive data, leading to breaches of confidentiality. This is particularly concerning when transmitting proprietary or personal information.
Service Disruption
Manipulated routes can cause service disruptions or outages, affecting an organization’s operations and reputation. Online services become inaccessible, resulting in customer dissatisfaction.
Malware Injection
Attackers can inject malware into data packets that take advantage of security gaps along compromised routes. These malware payloads can then be delivered to the target system.
Mitigating Security Risks
Implementing Strong Encryption
Encrypting data packets ensures that even if they’re intercepted, the information remains indecipherable to unauthorized parties. Strong encryption algorithms add an extra layer of security.
Access Control Measures
Implementing strict access controls prevents unauthorized users from gaining entry to the network. Multi-factor authentication and robust user identity management are crucial components.
Regular Security Audits
Conducting routine security audits helps identify vulnerabilities in route configurations. Regular checks ensure that routes are accurately configured and haven’t been tampered with.
Best Practices for Robust Security
Zero-Trust Networking
Adopting a zero-trust approach means treating every user and device as a potential threat. This minimizes the impact of compromised routes, as no user is granted unconditional trust.
Redundancy and Failover Planning
Having redundant routes and failover mechanisms ensures that if one path is compromised, traffic can be rerouted seamlessly, minimizing service disruptions.
Keeping Routing Software Updated
Outdated routing software may have known vulnerabilities that attackers can exploit. Keeping software up to date ensures that security patches are applied promptly.
The Human Factor in the Security
Importance of User Training
Users should be educated about security best practices, including recognizing phishing attempts and avoiding suspicious links. Human error can inadvertently lead to route compromises.
Social Engineering Awareness
Attackers often use social engineering to manipulate individuals into revealing sensitive information. Increasing awareness can prevent employees from unwittingly aiding attackers.
Future Trends in the Security
AI-Powered Threat Detection
Artificial intelligence can analyze network traffic patterns and identify anomalies that may indicate a compromised route. This proactive approach enhances route security.
Quantum-Safe Cryptography
As quantum computing evolves, traditional encryption methods could be vulnerable. Quantum-safe cryptography ensures that data remains secure even against quantum attacks.
Conclusion
Route security is the linchpin of a secure and resilient network infrastructure. By understanding the vulnerabilities associated with route security and implementing robust mitigation strategies, organizations can safeguard their data, services, and reputation. The evolving landscape of threats necessitates a proactive and multifaceted approach to ensure the integrity of data transmission.
FAQs (Frequently Asked Questions)
What is the primary goal of route security?Route security‘s primary goal is to protect the integrity and confidentiality of data as it travels through networks.
Why is encryption important in route security? Encryption ensures that even if data packets are intercepted, they remain unreadable without the decryption key.
How can organizations prepare for quantum computing threats? Organizations can adopt quantum-safe cryptography to ensure their data remains secure against future quantum attacks.
What role does human error play in route security? Human error, such as falling for phishing attacks, can inadvertently lead to compromised routes or unauthorized access.
How does AI contribute to route security? AI-powered threat detection can identify unusual network patterns, helping to detect and mitigate route security breaches.
In today’s fast-paced world of software development, containerization has become a pivotal technology. Docker, the leading container platform, allows developers to create, deploy, and manage applications within isolated environments called containers. Docker Compose, an essential tool in the Docker ecosystem, simplifies the orchestration of multi-container applications. In this guide, we’ll take you through the process of installing Docker Compose step by step.
Table of Contents
Introduction to Docker Compose
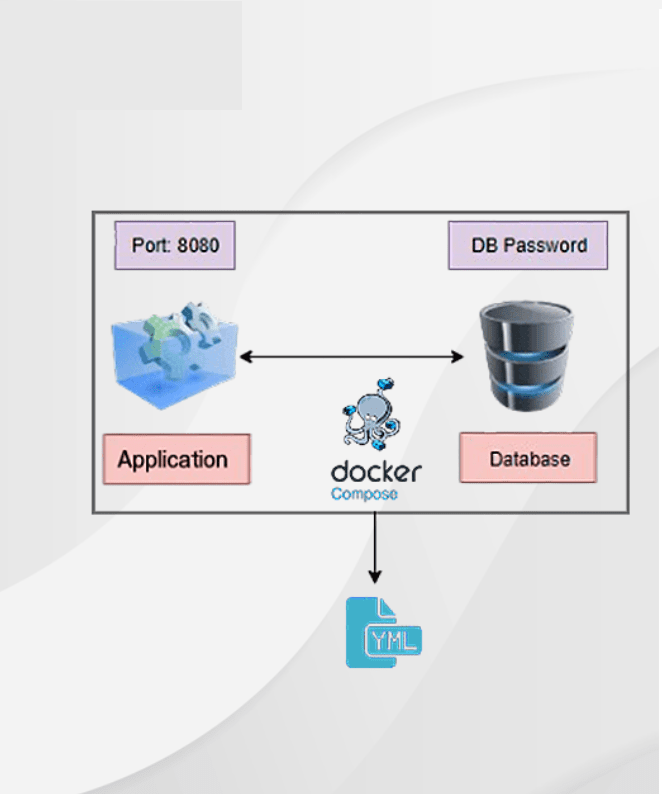
Docker Compose is a tool that simplifies the process of managing and orchestrating multi-container applications. It allows developers to define their application’s services, networks, and volumes in a single YAML configuration file. This eliminates the need to remember and execute complex command-line instructions for managing multiple containers.
Prerequisites
Before installing Docker Compose, it’s essential to have Docker installed on your system. Docker is a platform that enables developers to build, package, and distribute applications as containers. Containers are lightweight, portable, and isolated environments that ensure consistent behavior across different systems.
How to Install Docker Compose
To install Docker Compose, follow these steps:
Open a terminal window: Launch your system’s terminal or command prompt. This is where you’ll input the commands to install Docker Compose.
Download the Docker Compose binary: Use the provided command to download the latest Docker Compose binary. This binary is the executable file that allows you to use Docker Compose commands.
Apply executable permissions: After downloading the binary, you need to make it executable so you can run Docker Compose commands from any directory in your terminal.
Verifying the Installation
Once you’ve installed Docker Compose, it’s important to verify that the installation was successful:
Run the command: Enter the command ‘docker-compose --version‘ in your terminal. This command will display the version of Docker Compose that you installed. This step ensures that the installation process was completed without any issues.
Basic Usage of Docker Compose
Docker Compose simplifies the process of managing multiple containers as a single unit. Here’s a introductory example of how to use it:
Create a project directory: Make a new directory for your project and navigate into it using the ‘mkdir‘ (make directory) and ‘cd‘ (change directory) commands.
Define a ‘docker-compose.yml‘ file: Create a YAML file named ‘docker-compose.yml‘ in your project directory. In this file, you’ll define your application’s services, networks, and volumes.
Run the application: Use the ‘docker-compose up‘ command in your project directory. This command reads the ‘docker-compose.yml‘ file and starts the defined services in separate containers.
Writing a Docker Compose File
A Docker Compose file is written in YAML (YAML Ain’t Markup Language) format. YAML is a human-readable data serialization language that is easy to understand and write. In the ‘docker-compose.yml‘ file, you define each service in your application, its associated image, environment variables, volumes, and network connections.
Building and Running Services
Docker Compose makes it easy to build and run services defined in your ‘docker-compose.yml‘ file. When you execute ‘docker-compose up‘, it not only starts the services but also builds their respective container images if they haven’t been built already. This ensures consistency and ease of deployment across different environments.
Scaling Services
With Docker Compose, scaling your services becomes effortless. By specifying the desired number of replicas for each service, you can horizontally scale your application to handle increased loads. Docker Compose automatically manages load balancing and network connectivity between the scaled service instances.
Managing Dependencies
Docker Compose intelligently manages dependencies between services. If one service depends on another, Docker Compose ensures that the dependent service starts only after its dependencies are up and running. This eliminates race conditions and ensures that your application components work harmoniously.
Compose Command Reference
Docker Compose offers a wide range of commands for managing multi-container applications. These commands include starting, stopping, scaling, rebuilding, and inspecting services defined in the ‘docker-compose.yml‘ file. Refer to the official documentation for a comprehensive list of available commands and their usage.
Troubleshooting
When working with multi-container applications, issues may arise. Docker Compose provides helpful tools for troubleshooting and debugging. It allows you to view logs, check the status of running containers, and diagnose problems that might occur during the deployment and execution of services.
Docker Compose vs. Docker Swarm
Docker Compose and Docker Swarm are both tools for orchestrating containers, but they serve different purposes. Docker Compose is geared towards local development and testing environments, while Docker Swarm is a full-fledged container orchestration platform for managing large-scale production deployments. Consider your requirements when choosing between the two.
Real-world Use Cases
Docker Compose finds application in various real-world scenarios. From developing microservices-based applications to creating consistent development environments across teams, Docker Compose streamlines the process of managing complex applications and their dependencies.
Best Practices for Using Docker Compose
To make the most of Docker Compose, consider these best practices:
Keep your ‘docker-compose.yml‘ file organized and well-commented.
Use environment variables to parameterize your configuration.
Utilize named volumes for persistent data storage.
Regularly update Docker Compose to benefit from new features and bug fixes.
Conclusion
Docker Compose is a important tool that simplifies the deployment and operation of multi-container applications. By following the steps outlined in this guide, you’ve learned how to install Docker Compose, define services using the ‘docker-compose.yml‘ file, and manage your containers effortlessly. This knowledge equips you to harness the benefits of containerization and streamline your development workflow.
FAQs
Q1: Is Docker Compose suitable for large-scale applications?
Docker Compose is best suited for development and testing environments. For large-scale production deployments, consider tools like Docker Swarm or Kubernetes.
Q2: Can I use Docker Compose to manage single-container applications?
Yes, you can. While Docker Compose is designed for multi-container applications, it can also manage single-container setups effectively.
Q3: How often is Docker Compose updated?
Docker Compose is updated regularly to add new features, fix bugs, and improve performance. It’s recommended to stay updated with the latest version.
Q4: Can I use environment variables in my Docker Compose file?
Absolutely. Docker Compose supports the use of environment variables, allowing you to customize your services’ configurations easily.
Q5: Does Docker Compose work with Windows?
Yes, Docker Compose is compatible with Windows, Linux, and macOS, providing flexibility across different operating systems.
In the world of containerization, Docker has revolutionized the way software applications are developed, shipped, and deployed. One of the key aspects of Docker’s power lies in its ability to interconnect various containers seamlessly using Docker Compose. In this comprehensive guide, we will walk you through the ins and outs of setting up a Docker Compose network that ensures smooth communication between containers. Whether you’re a seasoned developer or just diving into the world of containers, our step-by-step approach will equip you with the knowledge and expertise to connect containers the right way.
Table of Contents
Docker Compose Network Setup: Connecting Containers the Right Way
Docker Compose simplifies the management of multi-container applications by allowing you to define your app’s services, networks, and volumes in a single docker-compose.yml file. This eliminates the complexities of manually configuring networks and ensures efficient communication between containers.
Understanding Docker Networking
Before diving into the setup process, it’s crucial to grasp the fundamentals of Docker networking. Docker employs a variety of network drivers, each with its own use case. Bridge networks are the default and are suitable for most applications. Host networks offer maximum performance but sacrifice container isolation. Overlay networks, on the other hand, are designed for multi-host communication. Depending on your project’s requirements, you can choose the appropriate network driver.
Writing the Docker Compose File
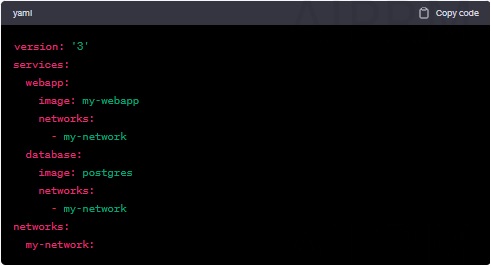
The heart of your Docker Compose network setup lies in the docker-compose.yml file. This YAML-based configuration file defines your application’s services, networks, and volumes. Each service corresponds to a container, while networks facilitate communication between these containers. Volumes ensure persistent data storage even when containers are replaced. Below is a simplified example of a docker-compose.yml file for a web application and database:
Creating Custom Networks
To enhance container communication and security, Docker Compose allows you to create custom networks. This segregation prevents containers from different projects interfering with each other. You can create a custom network by adding a networks section to your docker-compose.yml file, as shown in the previous example.
Connecting Containers Across Networks
While containers within the same network can communicate effortlessly, there might be instances when you need to establish communication between containers on different networks. Docker Compose facilitates this by enabling containers to join multiple networks. This is especially useful when components of your application need to interact while maintaining network isolation.
Ensuring Network Security
Security is paramount in today’s digital landscape. Docker Compose provides features such as network segmentation and firewall rules to bolster your network’s security. By employing bridge networks, you create a barrier that isolates containers from external threats. Additionally, you can apply firewall rules to control inbound and outbound traffic, ensuring only authorized communication.
FAQs
How does Docker Compose differ from Docker Swarm?
Docker Compose is primarily used for defining and managing multi-container applications on a single host. Docker Swarm, on the other hand, is an orchestration tool used to manage multi-container applications across a cluster of Docker hosts.
Can I use Docker Compose to manage networks in a production environment?
While Docker Compose is excellent for local development and testing, it’s recommended to use more robust tools like Kubernetes for managing networks in production environments. Kubernetes offers advanced networking features and greater scalability.
How do I troubleshoot network communication issues between containers?
If you’re facing communication problems between containers, first ensure that they are connected to the same network. Double-check your docker-compose.yml file for any typos or misconfigurations. You can also use the docker exec command to access a container and perform network-related diagnostics.
Is it possible to create a network that spans multiple hosts?
Yes, Docker provides overlay networks that allow containers to communicate across multiple hosts. This is particularly useful for scenarios where you have containers distributed across different machines.
Can I modify network configurations without restarting containers?
Yes, Docker Compose allows you to modify network configurations without restarting containers. Simply update your docker-compose.yml file and execute the docker-compose up command with the --no-recreate flag.
How can I ensure secure communication between containers?
To ensure secure communication between containers, it’s advisable to use encrypted communication protocols such as HTTPS. Additionally, you can configure firewall rules and network policies to restrict unauthorized access.
Conclusion
Efficiently connecting containers is a cornerstone of successful containerization. With Docker Compose, you have a powerful tool at your disposal to achieve seamless communication between containers. By understanding the fundamentals of Docker networking, crafting a well-structured docker-compose.yml file, and leveraging custom networks, you can build robust and secure containerized applications. So go ahead, experiment, and embrace the world of Docker Compose networking to take your application deployment to the next level.
Containerization has revolutionized the world of software development, offering greater effectiveness, scalability, and consistency. Docker has emerged as a leader in this field, and with the introduction of Docker Compose, the process of container orchestration has become even more streamlined. In this article, we will explore the power of Docker Compose Up, how it contributes to efficient container orchestration, and its benefits for development teams.
Table of Contents
Introduction to Docker Compose
Docker Compose is a powerful tool that allows developers to define and manage multi-container Docker applications. It provides a simple way to run multiple services as a single unit, defining their relationships and configurations in a single YAML file. This eliminates the complexity of managing containers individually and ensures consistency across different environments.
Understanding Container Orchestration
Container orchestration involves managing the deployment, scaling, and operation of containerized applications. It ensures that all components of an application work seamlessly together. While orchestration tools like Kubernetes exist, Docker Compose focuses on simplifying the process for smaller projects or development environments.
The Role of Docker Compose Up
docker-compose up is the command that brings your defined services to life. It reads the Docker Compose file and starts the containers with the specified configurations. This single command eliminates the need to set up each service separately, saving time and reducing errors.
Getting Started with Docker Compose Up
To get started, ensure you have Docker Compose installed on your system. Create a docker-compose.yml file to define your services, networks, and volumes. Then, by running docker-compose up, you start all services defined in the YAML file.
Writing Your Docker Compose File
The Docker Compose file is where you define your application’s architecture. You can specify the base images, build contexts, ports, environment variables, and more. This declarative approach ensures consistency across development, testing, and production environments.
Managing Dependencies and Services
Docker Compose simplifies managing complex service dependencies. You can specify which services rely on others, ensuring proper initialization and shutdown sequences. This makes it easier to create intricate application architectures.
Scaling Your Applications Easily
As your application grows, you might need to scale certain services. Docker Compose makes scaling as simple as specifying the desired number of replicas in your YAML file. This ensures your application can handle increased load efficiently.
Networking Made Simple with Docker Compose
Docker Compose automatically creates a default network for your services, allowing them to communicate seamlessly. You can also define custom networks for more complex setups, ensuring isolation and security.
Environment Configuration and Secret Management
Storing configuration in environment variables is a best practice, and Docker Compose makes it effortless. You can also manage sensitive information like passwords and API keys securely using Docker’s built-in secret management.
Handling Data Volumes
Persistent data is crucial for many applications. Docker Compose enables you to define data volumes, ensuring that data persists even if containers are recreated. This is vital for databases and file storage.
Version Control and Collaboration
With the Docker Compose file stored in your version control system, collaboration becomes smoother. Team members can work on the same configuration, reducing conflicts and ensuring everyone uses the same environment.
Monitoring and Troubleshooting
Docker Compose provides tools to monitor and troubleshoot your applications. You can view logs, check resource usage, and quickly identify issues, making debugging more efficient.
Docker Compose Up vs. Other Orchestration Tools
While Docker Compose is suitable for smaller projects, larger applications might benefit from more robust orchestration tools like Kubernetes. Assess your project’s scale and complexity to determine the most appropriate solution.
Real-world Use Cases
Numerous real-world use cases showcase Docker Compose’s effectiveness. From deploying microservices to setting up development environments, its versatility shines through.
Conclusion
Docker Compose Up simplifies the process of container orchestration, making it accessible to developers of all levels. Its ability to define, manage, and scale multi-container applications from a single configuration file streamlines development workflows and ensures consistency across different environments.
FAQs
Is Docker Compose suitable for production environments? While Docker Compose is excellent for development and testing, larger production setups often require more advanced orchestration tools like Kubernetes.
Can I define my custom configurations for services? Absolutely! Docker Compose allows you to define various configurations such as ports, environment variables, and more in the YAML file.
What happens if one service depends on another that’s not ready? Docker Compose handles dependencies intelligently. It waits until all required services are ready before starting dependent ones.
Can I use Docker Compose with cloud services? Yes, you can deploy Docker Compose files to various cloud platforms, making it easier to manage your applications in the cloud.
How do I update my application’s containers using Docker Compose? By running docker-compose up with the --build flag, you can rebuild and update your application’s containers based on the changes in your Docker Compose file.
If you’re delving into the world of containerization, chances are you’ve encountered Docker and its powerful toolset. Docker Compose is a crucial part of this ecosystem, allowing you to define and manage multi-container applications. In this comprehensive guide, we will explore Docker Compose volumes, a fundamental aspect of managing data within containers. By the end, you’ll have a solid understanding of how volumes work, why they’re important, and how to master them effectively.
Table of Contents
Introduction to Docker Compose
What is Docker Compose?
Docker Compose is a tool that allows developers to define and manage multi-container applications using a simple YAML file. It streamlines the process of deploying complex applications by describing their components, services, networks, and other configuration aspects in a single file.
Why are Containers Popular?
Containers have gained immense popularity due to their lightweight nature, portability, and reproducibility. They encapsulate an application and its dependencies, ensuring consistent behavior across different environments.
Understanding Docker Compose Volumes
What are Docker Compose Volumes?
Docker Compose volumes are a mechanism for persistently storing and sharing data between containers and the host system. They enable data to survive container restarts, updates, and even when containers are removed.
Why Do We Need Volumes?
In the world of containers, where containers are meant to be stateless and ephemeral, data persistence is a challenge. Volumes provide a solution by decoupling data from the container itself, allowing it to be managed separately.
Types of Volumes
Docker Compose supports different types of volumes, such as bind mounts, Docker named volumes, and anonymous volumes. Each type has its own use cases and benefits, catering to various application requirements.
Getting Started with Volumes
Basic Syntax
Defining volumes in Docker Compose is straightforward. You specify the volume’s name and optionally its driver, as well as any other configuration settings required.
Creating Volumes
Creating a volume in Docker Compose is as simple as adding a volumes section to your docker-compose.yml file and specifying the volume’s name. Docker will take care of the rest.
Mounting Host Directories
Bind mounts allow you to mount a directory from the host machine into a container. This is useful for sharing configuration files, source code, or other data between the host and containers.
Persisting Data with Volumes
Data Persistence in Containers
Containers are designed to be transient, but many applications require data to persist. Volumes offer a way to keep data separate from containers, making it easier to manage and backup.
Managing Stateful Applications
Stateful applications, like databases, need consistent storage across container restarts. Volumes ensure that critical data remains intact, preventing data loss.
Bind Mounts vs. Volumes
While bind mounts offer simplicity and direct access to host files, Docker named volumes provide better management, portability, and compatibility across different environments.
Docker Compose Volume Configuration
Defining Volumes in docker-compose.yml
In your docker-compose.yml file, you can define volumes under the volumes section for each service. This allows you to control where data is stored and how it’s accessed by containers.
Specifying Volume Drivers
Docker supports various volume drivers that offer different storage backends, such as local storage, network-attached storage, and cloud-based storage solutions.
Controlling Permissions
Managing file permissions between the host and containers can be a challenge. Docker Compose provides options to set permissions, ensuring data security and accessibility.
Practical Use Cases
Sharing Configuration Files
Volumes make it easy to share configuration files between containers. This is particularly useful when you have multiple services that need access to common configuration data.
Database Management
Databases often require persistent storage. Docker named volumes can be used to ensure that database data survives container updates and restarts.
Logging and Monitoring
Containerized applications generate logs and monitoring data. By mapping volumes to host directories, you can easily access and analyze these logs.
Best Practices for Using Volumes
Isolating Data from Containers
Separating data from containers promotes a clean architecture and simplifies management. It also ensures that containers can be replaced or scaled without affecting data.
Backup and Restore Strategies
Regularly backing up volumes is essential to prevent data loss. Docker’s volume management features can be leveraged to create effective backup and restore strategies.
Security Considerations
When using volumes, consider data security. Encryption, access controls, and monitoring are crucial to ensure the integrity and confidentiality of your data.
Troubleshooting Volume Issues
Volume Mounting Errors
Sometimes, volume mounting can fail due to misconfigured paths or permissions. Understanding the common issues and solutions can save time in debugging.
Data Synchronization Problems
In certain cases, data within containers might not synchronize properly with the host. These issues can be resolved by verifying volume configurations.
Inspecting Volume Contents
You can inspect the contents of a volume by accessing it from the host system. This can help in diagnosing problems and understanding the data being stored.
Advanced Volume Features
Docker Named Volumes
Docker named volumes provide a way to refer to volumes by a user-friendly name rather than a cryptic ID. This improves readability and maintainability.
Anonymous Volumes
Anonymous volumes are useful when you don’t need to manage or reference a volume explicitly. Docker handles their creation and cleanup automatically.
Using External Volumes
External volumes, such as network-attached storage or cloud storage, can be integrated with Docker Compose to store data externally. This enhances scalability and redundancy.
Scaling and Load Balancing
Volumes in Clustered Environments
In clustered environments, managing volumes across nodes requires careful consideration. Docker’s swarm mode and Kubernetes integration provide solutions for volume distribution.
Handling Volume Consistency
Ensuring volume consistency across multiple containers or replicas is vital for maintaining data integrity. Strategies like shared volumes or distributed file systems can help.
Load Distribution and Failover
Load balancers and failover mechanisms can be integrated with Docker Compose to ensure high availability and performance, even in the presence of volume-related issues.
Conclusion
Mastering Docker Compose volumes is essential for effectively managing data within containerized applications. By understanding the various volume types, configuration options, best practices, and advanced features, you can confidently design, deploy, and scale your container-based solutions.
Empower your applications with the flexibility, resilience, and data management capabilities that Docker Compose volumes offer. As you embark on your containerization journey, remember that mastering volumes is a key step towards becoming a Docker virtuoso.
FAQs
Q1:Can I use Docker Compose volumes with Kubernetes?
A: While Docker Compose volumes are primarily designed for use with Docker, Kubernetes offers its own volume management system that can be used in conjunction with Docker containers.
Q2:Are Docker named volumes portable across different environments?
A: Yes, Docker named volumes are highly portable. They provide a consistent way to manage data, regardless of the underlying host or environment.
Q3:What is the difference between a bind mount and a Docker named volume?
A: Bind mounts directly link a directory on the host to a directory in the container, while Docker named volumes are managed by Docker and offer benefits such as better isolation and automated cleanup.
Q4:How do I secure data stored in Docker volumes?
A: Data security in Docker volumes can be achieved through encryption, proper access controls, and regular security audits. Consider using volume plugins that offer encryption at rest.
Q5:Can I change the location of a Docker named volume after it’s created?
A: Docker named volumes are managed by Docker and are usually stored in a specific location on the host. Changing their location after creation is not a recommended practice.
If you’ve ever embarked on the journey of containerization with Docker compose ports, you’ll know that managing the interactions between your containerized applications and the outside world is an essential aspect. This is the area where port mapping comes into work. Docker Compose, a powerful tool for defining and running multi-container Docker applications, offers an elegant solution for handling port mappings effectively. In this article, we’re going to explore the best practices for Docker Compose ports mapping and provide you with some practical examples to solidify your understanding.
Table of Contents
Why Port Mapping Matters
Before diving into the intricacies of port mapping in Docker Compose, let’s establish why it matters. Imagine you have a web application running inside a Docker container that you want to access from your host machine or expose to the public internet. Port mapping enables you to bridge the gap between the internal network of the container and the external network, allowing seamless communication between them.
The Basics of Docker Compose Ports Mapping
Docker Compose ports mapping is all about establishing a connection between ports inside your Docker containers and ports on your host machine. This connection is bidirectional, meaning data can flow both ways. The syntax is fairly straightforward: you define the port you want to expose on the host machine followed by a colon and the port within the container. For example, if you want to expose a web server running on port 80 inside the container to port 8080 on the host, you’d use the syntax 8080:80.
Best Practices for Effective Port Mapping
When it comes to port mapping in Docker Compose, following best practices can save you from future headaches. Here are some key tips:
1. Use Explicit Ports for Better Clarity
While Docker automatically assigns ports if not explicitly defined, it’s a good practice to specify the ports yourself. This not only provides better clarity but also makes it easier for other team members to understand your configuration.
2. Avoid Using Well-Known Ports
Well-known ports (those under 1024) are often reserved for system services. It’s generally a good idea to avoid using them for your applications to prevent conflicts with existing services.
3. Utilize Environment Variables for Flexibility
Sometimes, you might need to change the port your application uses without modifying the Docker Compose file. Using environment variables for port numbers allows you to achieve this flexibility without altering the configuration.
4. Document Your Port Mapping Choices
In a collaborative development environment, proper documentation is key. Alongside your Docker Compose file, make sure to document the purpose of each port mapping so that everyone working on the project understands its role.
Mapping Ports for Different Use Cases
Let’s explore various scenarios where Docker Compose ports mapping shines:
Mapping a Port for Web Applications
Suppose you’re running a web application within a container and want to access it from your host machine’s browser. By mapping the container’s port (e.g., 80) to a port on your host (e.g., 8080), you can effortlessly access the application at http://localhost:8080.
Mapping Ports for Database Connections
If your application relies on a database, you’ll likely need to map the database’s port to the host. This allows your application to communicate with the database, facilitating seamless data exchange.
Mapping Ports for Inter-Container Communication
In a microservices architecture, different services often need to communicate with each other. Port mapping lets you set up communication channels between containers, enabling efficient data sharing.
Debugging and Troubleshooting Port Mapping
Despite your best efforts, issues might arise with your port mapping setup. Here’s how to troubleshoot:
Checking Running Containers and Ports
Use the docker ps command to see the running containers and their associated ports. This helps ensure your containers are up and running as intended.
Checking Firewall and Security Groups
Firewalls or security groups might block the communication between your containers and the host. Make sure your firewall rules and security groups allow the required ports.
Inspecting Docker Compose Logs
Docker Compose logs provide insights into container behaviors. If a container fails to start due to port conflicts or other issues, the logs will give you valuable information for debugging.
Real-world Examples of Docker Compose Ports Mapping
Let’s dive into some practical examples to illustrate how Docker Compose ports mapping works:
WordPress with MySQL: A Classic Example
Suppose you want to set up a WordPress website with a MySQL database. By mapping the MySQL container’s port (e.g., 3306) to a port on your host, WordPress can communicate with the MySQL database seamlessly.
Microservices Architecture with Multiple Port Mappings
In a microservices architecture, you might have various services communicating with each other. By mapping the required ports, you enable smooth interaction between different services, ensuring the entire system functions harmoniously.
Security Considerations
While port mapping offers convenience, it’s essential to consider security implications:
Using Host Network Mode Cautiously
Using the host’s network mode allows containers to share the host’s network stack. While this can improve performance, it reduces isolation and can introduce security risks.
Implementing SSL/TLS with Port Mapping
If you’re exposing services to the public internet, consider implementing SSL/TLS encryption. This protects sensitive data and ensures secure communication.
Scaling Applications with Port Mapping
As your application grows, you might need to scale it by running multiple instances. Load balancing becomes crucial, and port mapping plays a role here:
Load Balancing Across Containers
By mapping the same port for multiple containers and using a load balancer, you distribute incoming traffic evenly across instances, ensuring efficient resource utilization.
Managing Ports in Swarm Mode
In Docker Swarm, which orchestrates multiple Docker containers, port mapping works similarly. Docker Swarm manages the port assignments, making scaling and load balancing easier.
Conclusion
Docker Compose ports mapping empowers you to create well-connected containerized environments, enabling your applications to communicate seamlessly with the outside world. By following best practices, you ensure clarity, flexibility, and security in your port mapping configurations. With real-world examples and troubleshooting tips, you’re now equipped to navigate the intricate landscape of Docker Compose ports mapping confidently.
FAQs
1. What is Docker Compose? Docker Compose is a tool for defining and running multi-container Docker applications. It simplifies the process of managing interconnected containers.
2. How does port mapping work in Docker Compose? Port mapping establishes a connection between a port inside a Docker container and a port on the host machine, facilitating communication.
3. Can I use the same port for multiple containers? No, each port on the host machine can only be mapped to one container’s port. Using the same port for multiple containers would lead to conflicts.
4. Is Docker Compose suitable for production environments? While Docker Compose is great for development and testing, for production setups, consider more advanced orchestration tools like Kubernetes.
5. Where can I learn more about Docker and containerization? To dive deeper into Docker and containerization concepts, explore the official Docker documentation and reputable online resources.
In the world of containerization and orchestration, tools like Docker Compose have become household names, enabling developers to define and manage multi-container applications with ease. However, there’s a new kid on the block that’s gaining traction – Podman Compose. In this article, we’ll dive into the world of Podman Compose, exploring its features, benefits, and how it simplifies container orchestration.
Table of Contents
What is Podman Compose?
Podman Compose is a powerful tool that enables developers to define and manage multi-container applications, similar to Docker Compose. It falls under the Podman project, which aims to provide a seamless container experience without requiring a daemon to run containers. This tool is particularly useful for orchestrating complex applications that consist of multiple interconnected services.
How Does Podman Compose Differ from Docker Compose?
While both Podman Compose and Docker Compose serve the same purpose – managing multi-container applications – there are notable differences. Unlike Docker, Podman doesn’t require a centralized daemon to run containers, which contributes to improved security and eliminates the single point of failure. Additionally, Podman supports rootless containers, enhancing isolation and reducing potential attack vectors.
Getting Started with Podman Compose
To begin using Podman Compose, you’ll need to install Podman on your system. It’s compatible with various Linux distributions and offers a straightforward installation process. Once installed, you can start defining your multi-container applications using YAML configuration files.
Defining Multi-Container Applications
It allows you to define your application’s structure, services, and network configurations in a YAML file. Each service is defined as a separate container, and you can specify various options such as images, volumes, environment variables, and more. This declarative approach simplifies the process of creating complex application setups.
Using YAML Configuration
The YAML configuration file provides a clear and concise way to define your application’s components and their relationships. You can define services, networks, volumes, and other settings, all organized in a human-readable format.
Declaring Services and Volumes
In its YAML file, you can declare each service your application requires. For instance, if you’re building a web application that includes a frontend and a backend, you would define two services with their respective container images, dependencies, and configurations. Volumes can also be defined to ensure persistent data storage across container restarts.
Running and Managing Applications
Once your Podman Compose YAML file is set up, launching your application is as simple as running a single command. It reads the configuration and automatically starts the defined services, connecting them as specified. You can also manage the application’s lifecycle easily, including starting, stopping, and removing containers.
Benefits of Using Podman Compose
Security and Rootless Containers
One of the standout features of it is its support for rootless containers. Unlike Docker, which requires elevated privileges to run containers, Podman allows you to create and run containers as an unprivileged user. This enhances security by minimizing potential attack vectors and reducing the impact of security breaches.
Compatibility with Kubernetes
It is designed to be compatible with Kubernetes manifests. This means you can take your Podman Compose files and transition them to Kubernetes clusters seamlessly, leveraging the power of Kubernetes for production deployments without a steep learning curve.
Use Cases for Podman Compose
Development Environments
It is incredibly useful for creating development environments that mirror production setups. You can define the same services, configurations, and dependencies in both environments, ensuring consistency and minimizing the “it works on my machine” problem.
Testing and Staging
In testing and staging environments, where you need to validate your application’s behavior before deploying to production, it shines. It allows you to replicate the production environment’s architecture, making it easier to identify and fix issues early in the development process.
Migrating from Docker Compose to Podman Compose
Migrating from Docker Compose to Podman Compose is relatively straightforward. The YAML structure remains largely the same, and Podman provides compatibility options for Docker Compose files. This means you can smoothly transition your existing projects to take advantage of Podman’s features.
Tips for Effective Container Orchestration
Keeping Services Decoupled
When designing your application’s services, it’s crucial to keep them decoupled and modular. This ensures that changes to one service don’t adversely affect others, promoting scalability and maintainability.
Monitoring and Scaling
Utilize monitoring tools to keep track of your application’s performance and resource usage. Additionally, design your services with scalability in mind, enabling you to adjust resources and replicate containers as needed.
Challenges and Considerations
Learning Curve
While transitioning from Docker Compose to Podman Compose might be straightforward, there’s still a learning curve if you’re new to the tool. Familiarizing yourself with the syntax, options, and best practices will ensure a smooth experience.
Ecosystem Differences
While it offers compatibility with Kubernetes, keep in mind that the broader container ecosystem might have differences in terms of available tools, integrations, and resources.
Future of Podman Compose
Podman Compose’s future looks promising, with an active community and ongoing development. As containerization and orchestration technologies continue to evolve, it is likely to see enhancements, new features, and improved compatibility.
Conclusion
In the realm of container orchestration, it emerges as a powerful tool that simplifies the management of multi-container applications. Its unique features, including rootless containers and compatibility with Kubernetes, set it apart from its counterparts. Whether you’re developing, testing, or deploying applications, it offers a user-friendly and secure approach to container orchestration.
FAQs
Is Podman Compose suitable for production environments? it is suitable for both development and production environments. Its support for rootless containers enhances security, making it a viable choice for production use.
Can I use Podman Compose with Kubernetes? Yes, it is designed to be compatible with Kubernetes. You can transition from Podman Compose to Kubernetes manifests seamlessly.
What are the security advantages of it? It’s support for rootless containers reduces security risks by allowing containers to run with lower privileges, minimizing potential attack vectors.
How does it handle persistent data? It supports volume definitions, ensuring that data persists even when containers are restarted or replaced.
Can I use it on Windows? Currently, it is more focused on Linux environments, but efforts are being made to improve compatibility with Windows.
In today’s fast-paced digital landscape, businesses are constantly seeking ways to optimize their operations and streamline their processes. One revolutionary solution that has emerged in recent years is the adoption of cloud-native databases. These innovative tools are transforming the way modern businesses handle their data, offering unmatched efficiency, scalability, and flexibility. In this article, we will explore the concept of cloud-native databases and how they are revolutionizing the business landscape.
Introduction
In an era where data is the driving force behind decision-making, the need for efficient and reliable database solutions has never been greater. Cloud-native databases have emerged as a game-changer, offering businesses a way to manage and utilize their data more effectively.
Understanding Cloud-Native Databases
Cloud-native databases are database management systems specifically designed to operate in cloud environments. Unlike traditional databases that are confined to on-premises hardware, it leverages the power of cloud infrastructure to deliver seamless performance, scalability, and accessibility.
Benefits of Cloud-Native Databases
Scalability and Flexibility
One of the standout advantages of it is their ability to scale effortlessly. Businesses can upscale or downscale their database resources based on demand, ensuring optimal performance during peak usage periods and cost savings during slower times.
Enhanced Performance
Cloud-native databases are built for speed. They use advanced caching mechanisms, optimized query processing, and distributed architecture to deliver lightning-fast response times, enabling businesses to derive insights from their data in real-time.
Cost-Efficiency
The pay-as-you-go model of cloud-native databases allows businesses to eliminate upfront infrastructure costs. This cost-efficiency is further enhanced by the automatic resource allocation, which ensures resources are allocated based on actual usage, preventing wastage.
Security and Reliability
It often comes with robust security features, including encryption, identity and access management, and automated backups. Additionally, the redundancy and high availability of cloud infrastructure enhance data reliability and availability.
Transitioning to Cloud-Native Databases
Migrating to cloud-native databases requires careful planning and execution. Businesses should assess their current infrastructure, data requirements, and goals before embarking on the migration journey. Partnering with experienced cloud service providers can facilitate a smoother transition.
Choosing the Right Solution
Selecting the appropriate its solution depends on factors such as data volume, query complexity, and desired features. Businesses can choose from a range of options, including relational databases, NoSQL databases, and NewSQL databases, each tailored to specific use cases.
Best Practices for Implementation
Implementing it involves following best practices to ensure a successful deployment. This includes optimizing queries, monitoring performance, setting up automated backups, and implementing disaster recovery measures.
Real-World Use Cases
Numerous businesses across various industries have embraced it. E-commerce platforms utilize them to handle high transaction volumes, while IoT companies leverage their scalability to manage vast amounts of sensor data in real-time.
Challenges and Mitigations
While it offers immense benefits, they also present challenges like data migration complexities and vendor lock-in concerns. Businesses can overcome these challenges through thorough planning, proper training, and adopting multi-cloud strategies.
Future Trends
The future of cloud-native databases looks promising. As technology advances, we can expect further integration with AI and machine learning, enhanced automation, and even more sophisticated security features.
Conclusion
Embracing it marks a pivotal moment in the evolution of modern businesses. These databases empower organizations to harness the power of their data efficiently, driving innovation, improving decision-making, and staying ahead in an increasingly competitive landscape.
Frequently Asked Questions (FAQs)
What exactly is a cloud-native database? It is a database management system designed to operate in cloud environments, offering scalability, performance, and accessibility advantages.
How do cloud-native databases enhance performance?Cloud-native databases utilize caching mechanisms, optimized query processing, and distributed architecture to deliver rapid response times.
Are it secure? Yes, cloud-native databases often come with robust security features, including encryption, access management, and automated backups.
Can small businesses benefit from it? Absolutely. It’s pay-as-you-go model and scalability make them suitable for businesses of all sizes.
As businesses increasingly adopt Kubernetes in hybrid cloud environments, maintaining effective observability becomes crucial. Observability ensures that you have a clear understanding of how your applications are performing, how they’re interacting with each other, and if there are any underlying issues that need addressing. In this article, we’ll delve into ten powerful strategies to achieve robust Kubernetes observability in the context of hybrid cloud setups.
Introduction
In modern IT landscapes, Kubernetes has emerged as a go-to solution for orchestrating and managing containerized applications. However, as the complexity of these environments grows, the ability to observe and understand what’s happening within them becomes paramount.
Understanding Kubernetes Observability
Observability goes beyond simple monitoring. It’s about having the ability to gain insights into your system’s internal states through its external outputs. In the context of Kubernetes, observability involves closely monitoring various components like pods, services, and nodes to ensure everything is operating smoothly.
web programming and analytics graph in flat style vector illustration
Challenges in Hybrid Cloud Observability
Hybrid cloud setups, which combine on-premises infrastructure with cloud resources, introduce unique challenges to observability. Maintaining a consistent and comprehensive observability strategy across these diverse environments requires careful consideration.
Strategy 1: Comprehensive Logging Practices
Logging is the backbone of Kubernetes Observability. By collecting and analyzing logs from different parts of your application, you can quickly pinpoint issues and troubleshoot them effectively. Adopting a centralized logging approach streamlines log management, making it easier to search, analyze, and correlate logs for faster issue resolution.
Strategy 2: Leveraging Distributed Tracing
Distributed tracing is a powerful technique that allows you to follow the path of requests as they move through various services in your application. This insight is invaluable for identifying bottlenecks, understanding latency issues, and optimizing the performance of your system.
Real-time metrics monitoring provides instant visibility into the health of your Kubernetes cluster. Monitoring metrics such as CPU usage, memory utilization, network traffic, and application-specific key performance indicators (KPIs) allows you to detect anomalies and take proactive measures before they escalate into larger problems.
Strategy 4: Utilizing AIOps and Machine Learning
The use of Artificial Intelligence for IT Operations (AIOps) and machine learning can significantly enhance observability efforts. These technologies can automatically detect patterns, anomalies, and potential issues in real-time, enabling faster incident response and reducing manual intervention.
Strategy 5: Embracing Service Meshes
Service meshes like Istio and Linkerd are designed to simplify communication between microservices within Kubernetes clusters. They offer features like traffic management, security policies, and load balancing, all of which contribute to better observability by providing insights into how microservices interact and communicate.
Strategy 6: Proactive Security Monitoring
Observability isn’t solely about performance; it’s also about security. Implementing observability practices with a focus on security helps you quickly identify and respond to unauthorized access attempts, potential breaches, and vulnerabilities, ensuring the safety of your applications and data.
Optimizing resource usage is essential for efficient operations and cost management. Regularly monitoring resource utilization patterns allows you to identify over- or under-utilized resources, enabling you to make informed decisions about scaling and allocation.
Strategy 8: Centralized Monitoring and Visualization
Consolidating observability data into a single platform simplifies monitoring and troubleshooting. Visualization tools such as Grafana and Prometheus help transform complex data into comprehensible visualizations, aiding in identifying trends and anomalies.
Strategy 9: Seamless Integration with DevOps
Observability should be integrated into your DevOps practices. By incorporating observability tools and practices into your continuous integration and continuous delivery (CI/CD) pipelines, you can identify and address issues early in the development process, reducing the chances of problems reaching production.
Strategy 10: Continuous Improvement and Optimization
Observability is not a one-time effort but an ongoing process. As your hybrid cloud environment evolves, your observability strategies, tools, and processes should also evolve. Regularly assess and refine your approach to ensure it remains effective in the dynamic landscape of hybrid cloud Kubernetes environments.
Conclusion
In the realm of hybrid cloud environments, effective Kubernetes observability is a must. By implementing these ten strategies, you’ll be better equipped to monitor, troubleshoot, and optimize your applications, ultimately ensuring smooth operations and a positive user experience.
Frequently Asked Questions
Why is Kubernetes Observability important in hybrid cloud Kubernetes setups? Observability provides insights into how applications are performing in complex environments, aiding in troubleshooting and maintaining their health.
What are the key challenges in achieving observability in hybrid cloud settings? Challenges include integrating data from diverse sources, maintaining uniform monitoring standards, and addressing security concerns.
How does distributed tracing enhance Kubernetes Observability? Distributed tracing allows you to track the flow of requests across services, aiding in identifying performance bottlenecks and enhancing overall system efficiency.
Can Kubernetes Observability practices be automated? Yes, leveraging AIOps and machine learning can automate the detection of anomalies and potential issues, expediting incident response.
Is Kubernetes Observability a one-time setup? No, observability requires continuous refinement. The dynamic nature of hybrid cloud environments demands ongoing adjustments to strategies and tools.